Adding Planner to your Existing MS Teams

Microsoft Planner is a task management tool that your team can use to manage task and view the status of each task visually. It helps teams to create new plans, assign task and share files around projects or any other work that is going on. You can read more about it HERE.

In this blog post I am going to talk about how to add existing Plan to Teams. This is straight forward process but I still wanted to talk about some gotchas when adding Planner to the Team.

To add a Planner to the team you will go to any existing channel or create a new channel. Then you will click + sign to add a new tab. When you add a new tab you will have bunch of options to select type of tab. Here you will select Planner. Once you click Planner new dialog will open.

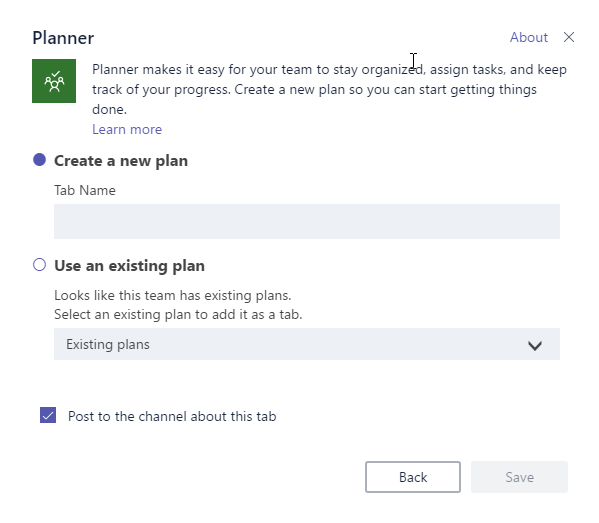
As you can see from the screen shot above I have a option to Create a new plan or Use and existing Plan. Now let me take a step back and explain what happens behind the scene. When you create a new Team or add Team to existing Office 365 Group you will have few things provisioned for you i.e. Office 365 Group, SharePoint Site and a Planner. Currently when writing this blog post there is one to one relationship between Planner and MS Groups. At the same time Teams have one to many relationship with Planner i.e. One team can have more than one Planner.

This is why you are seeing an option to either create a new Plan or use the existing Plan. If you select existing plan then you will have option to select your Plan from the dropdown and then you can access that Plan either from your Teams tab or from Planner Hub. When you create a new Plan then that Plan is not accessible from your Planner Hub and can only be visible from the Teams tab but tasks assigned to you are visible on the Planner Hub.

So it is bit confusing and I hope Planner and Teams team will work together to sort this out.

One last thing is that you will only see an option to select existing plan if you are an Owner on that Office 365 group. If you are member of a team and are allowed to add new tabs to the teams then you will only see Create new Plan option. So if you do not see option to select existing plan it might already be added to your team or you are not the owner on that Office 365 Group.

I hope this helps some of you.

Office 365 OneNote – “Sorry something went wrong”

For anyone new to OneNote, its an amazing tool for either taking personal notes or collaborating with your colleagues on various things. You can either access this after signing into Office 365 or use the desktop client and connect to your OneNote using your Office 365 credentials. I am not going to go into the details of what OneNote is and what it can do for you. I am sure there are plenty of videos and how to documents that you can refer to learn more about it.

This blog post is about an issue that you may run into when using OneNote. When you try to open the OneNote using your favorite link after signing into your Office 365 you may run into the following error.

“Sorry something went wrong”

Its not very helpful message as it does ont say much about the real issue.

If you share the URL of your OneNote with your colleague then they will get different error message and I think that error message is lot more descriptive and may point to the right issue.

The error message it throws is something along the lines of “Document does not exist or it has been deleted”. That is definitely interesting.
Before I can go into the details of what the real issue is it is important for everyone to know how OneNote works behind the scene in Office 365.

When you first time click the OneNote from your Office 365 it creates the OneNote file under your OneDrive for Business. Now by default it will create it under a folder called Notebooks. So as an end user if you are not using OneDrive then you will have no idea that your OneNote document is stored under your OneDrive.
Many times users when bulk deleting the folders under their OneDrive may also end up deleting the Notebooks folder. This is where you will run into the above problem.

Once you know what the real issue is, fix is very simple. You simply go to your OneDrive for Busienss and click Recycle bin. You should see your Notebooks folder right there and you can select the folder and click Restore. This would work just fine if you did not end up creating another Notebooks folder. In process of fixing the issue you may click the OneNote again and which in turn will create a brand new folder and new OneNote document. In that case simply rename the new folder that get created and then restore the folder again. This time it should work.

I hope it helps you understand how OneNote works and what you can do to recover accidentally deleted OneNote documents.