Microsoft Copilot for Microsoft 365’s UI Evolution

In the ever-evolving landscape of digital tools, Microsoft is set to enhance the user experience of its Copilot for Microsoft 365, aligning it more closely with the recently rebranded Microsoft Copilot (formerly Bing Chat Enterprise). This blog post delves into the upcoming UI changes slated for late March to mid-April 2024, their implications, and how they will refine the way we interact with these cutting-edge tools.

Unveiling the Changes: A Closer Look at the UI Updates

Enhanced Security Visualization

  • Green Shield Icon: A notable addition to the UI header, next to the user profile image, is the green shield icon. This icon is not just a visual element but a gateway to understanding Microsoft’s commitment to enterprise compliance. Hovering over or pressing this icon reveals a flyout description linking to detailed information about compliance standards.

Clarified Legal and Data Protection

  • Persistent Disclaimer: Beneath the chat prompt box, a new, always-visible disclaimer emphasizes Microsoft’s enterprise compliance, accompanied by links to the Terms, Privacy, and FAQs. This change ensures that users are constantly aware of the data protection standards upheld during their interactions.

Simplified User Interface

  • To reduce redundancy and enhance clarity, Microsoft is removing the blue lock icon and the legal disclaimer that previously appeared in multiple locations within the UI. These changes aim to streamline the user experience, making it easier to focus on what matters.

AI Accuracy Acknowledgment

  • Each chat will now feature a disclaimer at the bottom, marked by a shield and lock icon, reminding users of the potential inaccuracies in AI-generated content. This addition is a nod to the importance of critical engagement with AI outputs.

Streamlined Branding

  • In a significant shift, company branding, including logos, will be removed from the Copilot for Microsoft 365 UI, signaling a unified appearance across Microsoft’s Copilot platforms.

Rollout and Accessibility

These UI updates will be applied across various entry points, including Copilot.microsoft.com, Copilot in Bing, Edge, Windows, and mobile applications for Microsoft Copilot and Edge. However, it’s important to note that Copilot for Microsoft 365-specific entry points within Microsoft 365 apps will remain unchanged.

Impact on Your Organization

The upcoming changes are focused on the UI and do not alter the terms, privacy, or data protections of Microsoft Copilot for Microsoft 365. These enhancements are designed to improve user experience and compliance visibility without impacting the core functionalities and protections.

Preparing for the Change

To ensure a seamless transition, organizations should proactively inform their users about these UI updates. Familiarizing users with the new elements and their functionalities will help leverage the full potential of Microsoft Copilot for Microsoft 365’s enhanced interface.

Conclusion

Microsoft’s initiative to update the Copilot for Microsoft 365 UI reflects its commitment to improving user experience and alignment with enterprise compliance standards. As we anticipate these changes, it’s crucial for organizations to prepare and guide their users through this transition, embracing the new features and the enhanced security and clarity they bring to the digital workspace.

Introducing Copilot in Forms: Transforming the Way You Create Surveys

Revolutionizing Form Creation with AI

Microsoft is excited to unveil a groundbreaking feature in our suite of productivity tools: Copilot in Forms. This innovative addition is set to revolutionize how you create forms, making the process faster, easier, and more efficient. Designed for users who have licenses for Microsoft Copilot for Microsoft 365, this feature leverages the power of artificial intelligence to transform your form creation experience.

How Copilot in Forms Works

Imagine describing the form you need in natural language, and having an intelligent tool that instantly generates a draft for you. That’s exactly what Copilot in Forms does. It allows you to convey your requirements through simple descriptions, and Copilot takes care of the rest, providing a draft form that you can preview and refine to perfection.

But it doesn’t stop there. Copilot in Forms also suggests themes to enhance your form’s appearance, ensuring it’s not only functional but also visually appealing, to boost engagement from your target audience.

Deployment Timeline

This innovative feature is set to roll out globally, starting late February 2024, with completion expected by early March 2024. This strategic timeline ensures that Copilot in Forms will be available to enhance your productivity without delay.

Benefits for Your Organization

With Copilot in Forms, your organization can reap numerous benefits:

  • Efficiency: Dramatically reduce the time and effort spent on creating forms. Let Copilot handle the initial draft while you focus on refining and customizing.
  • Quality and Accuracy: Enhance the quality and accuracy of your forms. Copilot’s AI eliminates common design errors, helping you craft clear and effective surveys.
  • Engagement and Insights: Improve engagement and gain deeper insights. Copilot’s suggestions for diverse questions and options help capture your audience’s attention and gather valuable feedback.

Getting Started with Copilot in Forms

To leverage Copilot in Forms, ensure you have a Microsoft 365 account with access to Microsoft Forms. Here’s how to get started:

  1. In Microsoft Forms, opt to create a new form or select an existing template.
  2. Use Copilot by describing your desired form in your own words. You can also utilize prompts for inspiration.
  3. Hit the Generate button to let Copilot analyze your description and suggest a draft, complete with titles, questions, and answers.
  4. Refine the content with your input, guiding Copilot to fine-tune the draft to your exact needs.
  5. Once your form content is set, Copilot will recommend themes to enhance its visual appeal.
  6. Distribute your form via various channels like a short URL, QR code, Outlook, Teams, or an embedded link to gather responses.
  7. Finally, seamlessly integrate your form’s results with Excel for the web, enabling detailed and flexible data analysis.

Enhanced Privacy in Microsoft Teams Webinars: Introducing Attendee Identity Masking

In the realm of digital collaboration, privacy remains a paramount concern. Microsoft Teams, a cornerstone of workplace collaboration, is set to elevate this priority with its latest feature aimed at enhancing attendee privacy during webinars and meetings. This blog post delves into the upcoming feature that will revolutionize the way attendee information is displayed, ensuring a more private and focused meeting environment.

What’s New in Teams?

Microsoft Teams is rolling out a feature that will change how attendee information is displayed during meetings and webinars. Traditionally, participants could see the names, emails, and profile photos of other attendees. With the new update, however, attendee identities will be masked, providing an added layer of privacy.

This feature will be particularly useful in settings where confidentiality is crucial, such as educational webinars, HR discussions, or sensitive business meetings. Attendees’ names will appear simply as “Attendee” on various interface elements like the participant pane, chat, and stage, reducing distractions and focusing on content and discussion.

Exclusive to Teams Premium

It’s important to note that this feature will be exclusive to Teams Premium. Organizers, co-organizers, and presenters will retain the ability to see the full identity of each participant, ensuring they can manage the meeting effectively while respecting attendees’ privacy.

Rollout Timeline

Microsoft has outlined a phased rollout for this feature:

  • Targeted Release: Beginning in early November 2023, with completion by mid-November.
  • Standard Release: Starting in late November 2023, with full rollout by early December.
  • Government: Commencing in late December 2023, with final deployment by late June 2024.

Impact on Your Organization

To leverage this new feature, meeting organizers need to enable it in Meeting Options by activating the “Hide attendee names” setting before the meeting starts. It’s crucial to configure the “Who can present” setting appropriately to ensure that only designated individuals can see the full attendee list.

Preparation for Admins

For administrators, this capability will be enabled by default upon rollout. If there’s a need to disable this feature, it can be managed through PowerShell using the AttendeeIdentityMasking policy.

Conclusion

Microsoft Teams’ new attendee identity masking feature represents a significant step forward in balancing effective collaboration with privacy. As organizations continue to navigate the complexities of digital communication, such enhancements are vital for maintaining trust and confidentiality in virtual environments. Keep an eye on your Microsoft 365 Roadmap, specifically ID 119153, for more updates on this feature and prepare your organization to embrace this new level of privacy in Teams meetings and webinars.

Retrieving Public Groups, SharePoint Sites, and Teams Integration

In the ever-evolving landscape of Office 365, administrators and IT professionals are continually seeking efficient ways to manage and oversee their environments. Central to this management is the ability to effectively track and organize Office 365 groups, their associated SharePoint sites, and their integration with Microsoft Teams. This article delves into how you can seamlessly obtain a list of all public Office 365 groups, retrieve their SharePoint site URLs, and ascertain their Teams integration status, empowering you to enhance your administrative workflow and collaboration efficiency.

Prerequisites

Before diving into the technicalities, ensure you have the necessary tools and permissions. You will need administrative access to your Office 365 environment and PowerShell installed on your machine. Familiarity with the Microsoft Graph API can also be beneficial for more advanced operations.

Getting the List of Public Office 365 Groups using PowerShell

PowerShell is a powerful tool for managing Office 365 groups. Begin by installing and configuring the Entra ID or Microsoft Graph PowerShell SDK. Once set up, you can use the following script to list all public Office 365 groups:

Connect-AzureAD
Get-AzureADGroup -Filter "groupTypes/any(c:c eq 'Unified') and visibility eq 'Public'" | Select-Object DisplayName, ObjectId

This command connects you to Azure AD and fetches all public unified groups, displaying their names and object IDs.

Retrieving SharePoint Site URLs for Each Group

Every Office 365 group comes with a SharePoint site, which serves as a collaborative space for group members. To fetch the SharePoint site URL for each public group, use the following script:

$groups = Get-AzureADGroup -Filter "groupTypes/any(c:c eq 'Unified') and visibility eq 'Public'"
foreach ($group in $groups) {
    $site = Get-SPOSite -Identity "https://<YourTenantName>.sharepoint.com/sites/$($group.DisplayName)"
    Write-Output "Group: $($group.DisplayName), Site URL: $($site.Url)"
}

Replace <YourTenantName> with your actual tenant name to obtain the site URLs.

Determining if a Group has Teams Integration

To check whether a public Office 365 group has an associated Microsoft Teams instance, use the following script:

$groups = Get-AzureADGroup -Filter "groupTypes/any(c:c eq 'Unified') and visibility eq 'Public'"
foreach ($group in $groups) {
    $team = Get-Team -GroupId $group.ObjectId
    if ($team) {
        Write-Output "Group: $($group.DisplayName) has Teams integration."
    } else {
        Write-Output "Group: $($group.DisplayName) does not have Teams integration."
    }
}

This script identifies which groups are connected to Teams, providing a clear view of the collaboration landscape within your organization.

Conclusion

Efficient management of Office 365 groups, SharePoint sites, and Teams integration is crucial for maintaining a productive and well-organized digital workplace. The PowerShell scripts provided in this article are designed to streamline the process of monitoring and managing these components, offering clear insights and control over your Office 365 environment.

Microsoft Teams Rooms – Missing join button for external meeting

If you are using Microsoft Teams Rooms (MTR) then you may run into issues where your external meetings are getting rendered without the join button.

On the MTR table panel it will look like this where meeting will be displayed but there is no Join button.

This is likely related to your organization using some sort of url defense system which automatically modifies the external URLs.

For your MTR devices to be properly parse the external meeting you are required to white list the Teams, Zoom and Webex URLs.

Once you whitelist the above domains you should see that external meetings are getting rendered without any issue.

Enable MTR Device to join Zoom and WebEx meetings

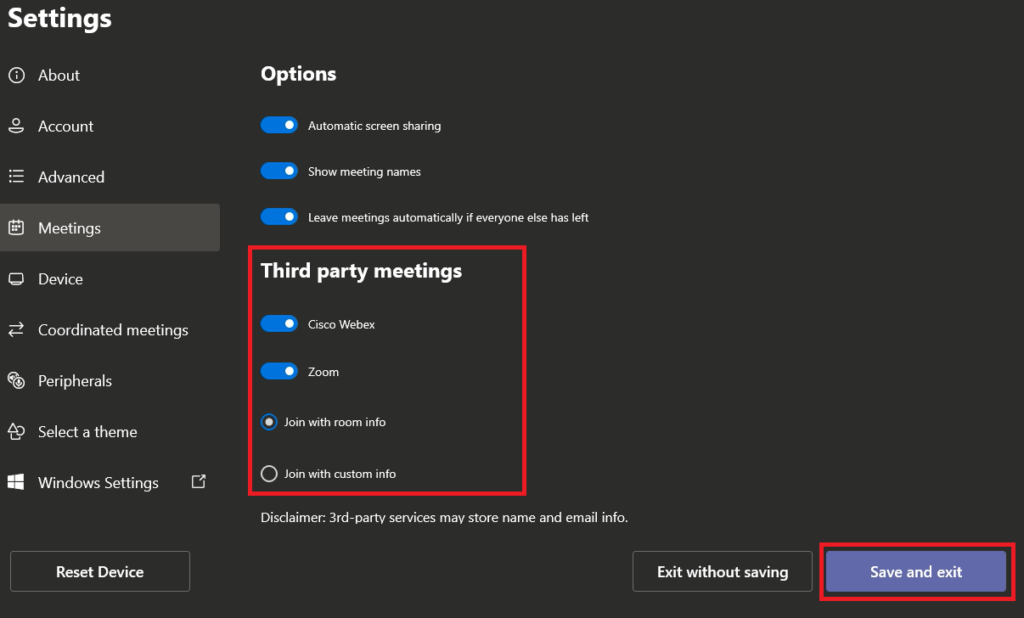
Microsoft Teams Rooms devices support a one-touch experience for joining third-party online meetings. When enabled, you can use Teams Rooms to join meetings hosted on Cisco WebEx and Zoom just as easily as you can join meetings hosted in Microsoft Teams.

One thing to note that this setting works just fine as long as you are using the audio and video conferencing. If you want to share the content (Host the meeting) using the laptop then you should join the Zoom or Webex meeting using your laptop and then use the MTR device for audio and video conferencing.

To configure Teams Rooms using the touchscreen console, do the following:

On the Microsoft Teams Rooms console, select More
Select Settings, and then enter the device administrator username and password.
Go to the Meetings tab and select Cisco WebEx, Zoom, or both.
If you want to join meetings with the username and email address associated with the room mailbox, select Join with room info.
If you want to join meetings with an alternate username and email address, select Join with custom info and enter username and email address you’d like to use.
Make sure you restart your device before this setting takes in effect.