Microsoft Teams – Managed Path for SharePoint Site

When using SharePoint online you would have noticed that you can create sites under /Sites or /Teams managed path. This is fine when you are creating classic sites where you can pick your managed path.

When creating modern sites you do not have option to select the managed path and it is always defaulted to /Sites managed path. This behavior is exactly the same when you create a new Team using MS Teams. When you create the new Team it creates the Office 365 Group as well as a brand new modern SharePoint site. This site is also created under the /Sites managed path.

What if you wanted to create all your teams connected SharePoint sites under /Teams managed path? Well it is possible as long as you want all your SharePoint sites gets created under /Teams managed path.

There is a setting in SharePoint Admin Center which allows you to select default managed path.

Go to your SharePoint Admin Center and click Settings.

Under Settings, scroll down to site creation section and there you would see that you can set the managed path for the new site that gets created.

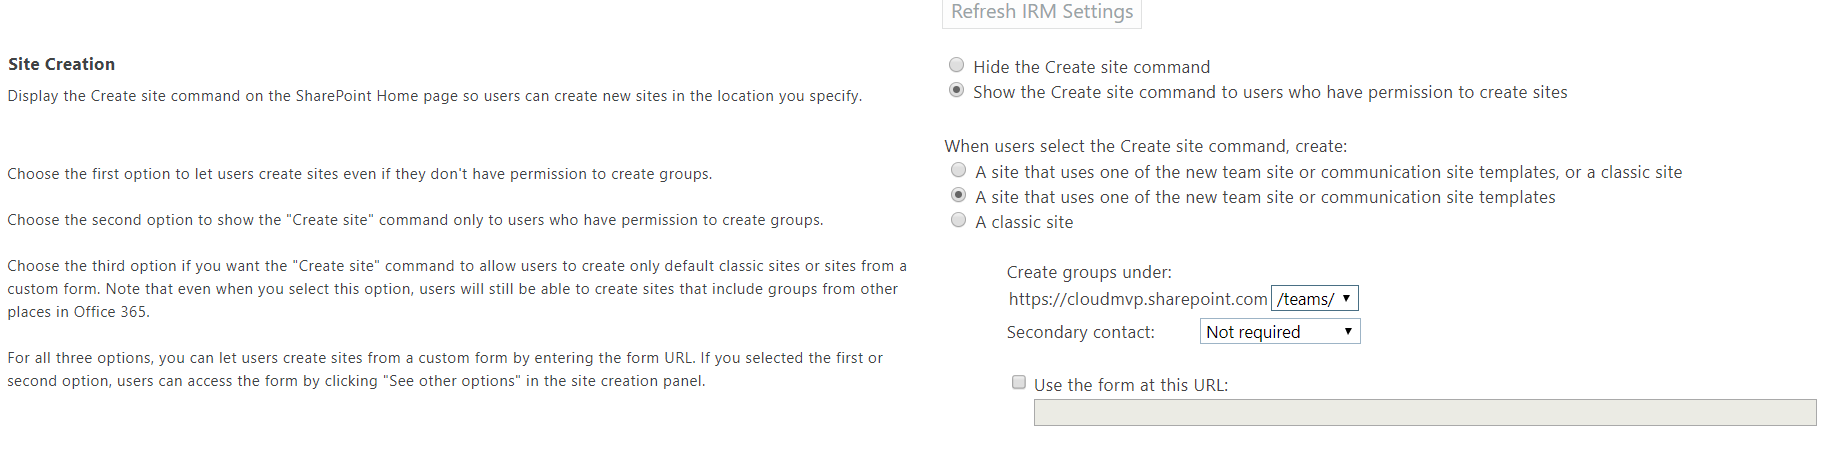
Now there is another gotcha here. This would only work if you have your Self Service Site Creation setting is set to “Show the Create Site Command to user who have permission to create sites”. The moment you choose “Hide the Create site command” option, section which allows you to set the managed path is not visible.

I really wish Microsoft would allow two things here.

  1. Allow me to add more managed paths
  2. Allow me to set the managed path for SP Sites that gets created as part of Teams. Probably a setting on the Teams Admin page.

I understand there is not much flexibility here but I hope this help someone.

SharePoint Online – Column Formatting rolling out to first release tenants

At Ignite 2017 Microsoft announced the Colum Formatting feature in SharePoint Online. You can check out the awesome session on Channel 9.

https://channel9.msdn.com/Events/Ignite/Microsoft-Ignite-Orlando-2017/BRK3252

Microsoft have started rolling out the column formatting feature to the first release tenants. For anyone who did not hear about column formatting, it helps customizing how SharePoint list columns gets displayed.

If you are currently using SharePoint on-premises then it is like JSLink. Not exactly the same but you can achieve many formatting options using column formatting. As a matter of fact there is git repo for the column formatting samples. Check them out below.

https://github.com/SharePoint/sp-dev-column-formatting

To use column formatting you can go to your SharePoint list column and select “Format this column” under “Column settings”.

This will open a “Format column” window on the right where you can paste your JSON and either click Preview to see the changes or click Save to apply the changes.

If there are any syntax errors then you will get the error notification on that screen so you can correct the error.

Anyone who can create and manage views in a list can access column formatting from the column settings.

For anyone who wants to get started with column formatting must check the following article out as it has all the details you need to know about column formatting.


https://docs.microsoft.com/en-us/sharepoint/dev/declarative-customization/column-formatting


I will cover some examples that I have used in my next blog post.

SharePoint Communication site pages in Microsoft Teams

For anyone that is living under the rock, in May last year Microsoft announced Communication sites. Communication sites are mobile friendly and allows users to communicate to people throughout the organization with beautiful, dynamic, mobile-ready communication sites and pages that keep everyone informed and engaged.

You can read more about that HERE and HERE.

While communication sites are awesome they are not Group connected sites. In many cases you would want to use Communication pages within your Team.

It is very simple to bring them to your Microsoft Teams.

  1. Go to Microsoft Teams and click Add a Tab (+)
  2. Click WebSite under the various options.
  3. Give tab a name and paste the URL and select if you want to share that message in your Team channel.

  4. Click Save and you should see the communication page shows up in your Team Tab.


Teams is smart enough to trim all the additional SharePoint controls and display only the page in the Teams teab.

This is one of the awesome feature and I cannot wait to start integrating MS Teams and communication pages.

Microsoft Flow – Get Item from SharePoint List

I wanted to write this blog post for a while. This one is on how to use Microsoft Flow and get SharePoint list item.

So when using Flow you have two actions for getting a SharePoint list Item.

  1. SharePoint  – Get Item
  2. SharePoint – Get Items


Picture above displays the description of each action.

Lets talk about the SharePoint – Get Item action first. As you can see that when using this action you will need to specify item ID to get the item. Now for the most part this would not work unless you have a context of the item and you are passing the ID using the context. We will talk about this in details when I cover For Each action. But for now my recommendation is do not use this action using the hard-coded ID unless you are in a situation where you have pretty static list and ID never changes.

Now the second action, SharePoint – get Items is the real deal. I mean do not judge that action by the description provided by Microsoft. That description does not justify the action. 😀

This action allows us to specify query to get the items and also allows us to specify Order By and Item count.

You need to specify ODATA filter query. You can get some general ideal about ODATA query using THIS article.

Basically you would have to specify field’s internal name and then your expression and then your value.

If you are expecting more than one item returned then you can use the Apply to Each action which I will cover in future blog post.

Office 365 – Cannot add Plan to your favorites – Planner

For anyone that is new to Office 365 and not know what Planner is then you should spend time understanding MS Planner service. Planner makes it easy for your team to create new plans, organize and assign tasks, share files, chat about what you’re working on, and get updates on progress.

In this blog post, I am not going to talk about Planner much but I am going to talk about potential issue that you may face depending on your tenant configuration.

When you are on the Planner Hub you see various options to visualize your plans. One of the feature is to add plan to your favorites.

When you add planner to your favorites you may receive the following error. As I said earlier this is not going to be the case for the most part but as far as I know in one specific scenario you may receive the following error when adding plans to your favorites.

Upon researching I found the following very useful blog post.

https://blogs.msdn.microsoft.com/brismith/2017/07/14/microsoft-planner-why-cant-i-add-favorites-or-comment/

With all credits to Brian (author of the blog post) I am posting scenario that I ran into where I go the above error.

In hybrid scenarios we do not support comments or favorites for users with their mailboxes on-premises as the users needs to have an Exchange Online mailbox to engage with these features.  EXCEPT – if the user does have an external email address configured and is configured as a MailUser in Exchange AD.  In this scenario the user will be able to use these features even though they have no EXO mailbox.  If the user is configured as a User rather than MailUser – and has no external email address then things won’t work.  This has explained the situations where some users work and some don’t in a hybrid environment.  Also of course some users may be fully in EXO and others in on-premises mailboxes.

So, if you run into the above error make sure to read the above blog post.

I hope this helps someone who is currently using Exchange in Hybrid scenario and running into this planner error.


Microsoft Teams now rolling out Guest Access

If you are using Microsoft Teams then you must know that  the #1 request feature on Microsoft Teams uservoice is to allow Guest Access. Microsoft Announced on September 11 that they will start rolling out Guest Access to Microsoft Teams.

This is awesome news and I am looking forward to testing the guest access with Microsoft Teams.

Now there are couple of things that we must know. Microsoft Teams have decided to only allow Azure AD accounts that are currently part of Office 365 tenant. This means if you are inviting external user as Guest to your MS Teams they must be part of any other Office 365 tenant as a regular user. Then you will be able to add them to your Team.

Now to add external users you will need to make sure that this setting is enabled at the admin level.

  • Navigate to your Office 365 Admin Center
  • Click Settings –> Services and add-ins –> Click Microsoft Teams
  • Select Guest from the “Select the user/license type you want to configure” dropdown
  • Turn ON the “Turn Microsoft Teams on or off for all users of this type” switch.

Once this is turned on you will be able to go to your MS Teams and add external users. Once the external users are added they can switch their tenants to access the Teams. Currently switching the tenant option is not supported on mobile devices and hence you must use the desktop app or browser to switch the tenant.

This is a great start by Microsoft Teams and hopefully in future we will more improvements around this area specifically allowing any external users and allow switching the Teams using mobile devices.