For anyone new to OneNote, its an amazing tool for either taking personal notes or collaborating with your colleagues on various things. You can either access this after signing into Office 365 or use the desktop client and connect to your OneNote using your Office 365 credentials. I am not going to go into the details of what OneNote is and what it can do for you. I am sure there are plenty of videos and how to documents that you can refer to learn more about it.
This blog post is about an issue that you may run into when using OneNote. When you try to open the OneNote using your favorite link after signing into your Office 365 you may run into the following error.
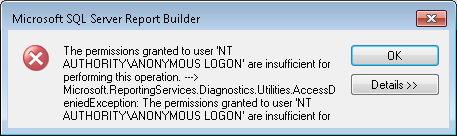
“Sorry something went wrong”
Its not very helpful message as it does ont say much about the real issue.
If you share the URL of your OneNote with your colleague then they will get different error message and I think that error message is lot more descriptive and may point to the right issue.
The error message it throws is something along the lines of “Document does not exist or it has been deleted”. That is definitely interesting.
Before I can go into the details of what the real issue is it is important for everyone to know how OneNote works behind the scene in Office 365.
When you first time click the OneNote from your Office 365 it creates the OneNote file under your OneDrive for Business. Now by default it will create it under a folder called Notebooks. So as an end user if you are not using OneDrive then you will have no idea that your OneNote document is stored under your OneDrive.
Many times users when bulk deleting the folders under their OneDrive may also end up deleting the Notebooks folder. This is where you will run into the above problem.
Once you know what the real issue is, fix is very simple. You simply go to your OneDrive for Busienss and click Recycle bin. You should see your Notebooks folder right there and you can select the folder and click Restore. This would work just fine if you did not end up creating another Notebooks folder. In process of fixing the issue you may click the OneNote again and which in turn will create a brand new folder and new OneNote document. In that case simply rename the new folder that get created and then restore the folder again. This time it should work.
I hope it helps you understand how OneNote works and what you can do to recover accidentally deleted OneNote documents.